

How To Create Widget For Android Application
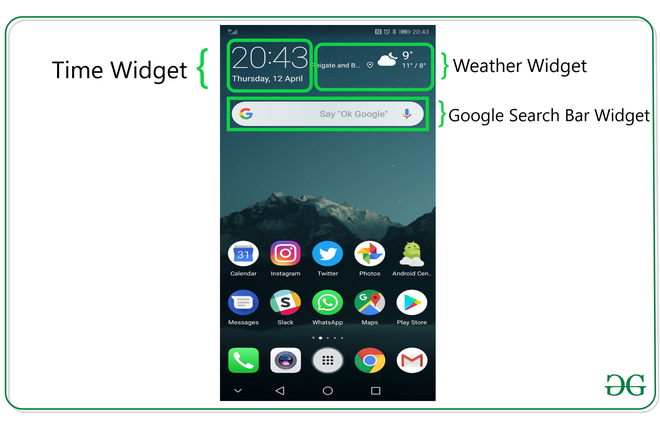
Widgets are the micro-version of the application that consists of some functionality of the application that is displayed only on the Home Screens or the Lock Screen. For example, we see Weather, Time, Google Search Bars on the Home Screen, and FaceLock, FingerprintLock on the Lock Screen, which are some of the Widgets available on the device. Widgets come along with the Application when you install it or download it from the Web. Generally, phones come with a manufacturing configuration but such elements can be adjusted by a user later in time. In this article, we demonstrate how one can implement a basic widget for an Android App.
Want a more fast-paced & competitive environment to learn the fundamentals of Android?
Click here to head to a guide uniquely curated by our experts with the aim to make you industry ready in no time!
Steps for Creating a Basic Widget
Step 1: Create a New Project
To create a new project in Android Studio please refer to How to Create/Start a New Project in Android Studio. We are implementing it for both Java and Kotlin languages.
Step 2: Add the App Widget to the Project
Right-Click on the app, move the cursor to new, find the "Widget" option at the end, select it.

Specify the required properties for the widget such as min. width and height, config file and preferred language, etc, and proceed. Files are automatically generated.

Step 3: Install and Run the Code
- Install and Run the code on Android Virtual Device (AVD) or a personal device.
- Open the widget section of the phone, lookup for a widget with the Application name, select it, bring it to the home screen.
- Try changing the dimensions and we are done!
Output: Run On Emulator
What extra files are generated in this process?
During this selecting and deploying process, a few extra files are generated and minor changes are made to existing files as well. No programming is required for generating a basic widget and is only required if an application is to be embedded inside the widget, as discussed in the later parts of the article. Let us now explain the newly generated files the changes make to the existing ones, one by one.
1. NewAppWidget.kt
Where it's generated?

Kotlin
import android.appwidget.AppWidgetManager
import android.appwidget.AppWidgetProvider
import android.content.Context
import android.widget.RemoteViews
class NewAppWidget : AppWidgetProvider() {
override fun onUpdate(
context: Context,
appWidgetManager: AppWidgetManager,
appWidgetIds: IntArray
) {
for (appWidgetId in appWidgetIds) {
updateAppWidget(context, appWidgetManager, appWidgetId)
}
}
override fun onEnabled(context: Context) {
}
override fun onDisabled(context: Context) {
}
}
internal fun updateAppWidget(
context: Context,
appWidgetManager: AppWidgetManager,
appWidgetId: Int
) {
val widgetText = context.getString(R.string.appwidget_text)
val views = RemoteViews(context.packageName, R.layout.new_app_widget)
views.setTextViewText(R.id.appwidget_text, widgetText)
appWidgetManager.updateAppWidget(appWidgetId, views)
}
Java
import android.appwidget.AppWidgetManager;
import android.appwidget.AppWidgetProvider;
import android.content.Context;
import android.widget.RemoteViews;
class NewAppWidget extends AppWidgetProvider {
@Override
public void onUpdate(Context context, AppWidgetManager appWidgetManager, int [] appWidgetIds)
{
for ( int appWidgetId : appWidgetIds) {updateAppWidget(context, appWidgetManager, appWidgetId);
}
}
@Override public void onEnabled(Context context)
{
super .onEnabled(context);
}
@Override public void onDisabled(Context context)
{
super .onDisabled(context);
}
private void
updateAppWidget(Context context, AppWidgetManager appWidgetManager, int appWidgetId)
{
String widgetText = context.getString(R.string.appwidget_text);
RemoteViews views = new RemoteViews(context.getPackageName(), R.layout.new_app_widget);
views.setTextViewText(R.id.appwidget_text, widgetText);
appWidgetManager.updateAppWidget(appWidgetId, views);
}
}
2. new_app_widget.xml
Where it's generated?

XML
< RelativeLayout
android:layout_width = "match_parent"
android:layout_height = "match_parent"
android:background = "#09C"
android:padding = "@dimen/widget_margin" >
< TextView
android:id = "@+id/appwidget_text"
android:layout_width = "wrap_content"
android:layout_height = "wrap_content"
android:layout_centerHorizontal = "true"
android:layout_centerVertical = "true"
android:layout_margin = "8dp"
android:background = "#09C"
android:contentDescription = "@string/appwidget_text"
android:text = "@string/appwidget_text"
android:textColor = "#ffffff"
android:textSize = "24sp"
android:textStyle = "bold|italic" />
</ RelativeLayout >
3. dimens.xml
Where it's generated?

XML
<? xml version = "1.0" encoding = "utf-8" ?>
< resources >
< dimen name = "widget_margin" >8dp</ dimen >
</ resources >
4. new_app_widget_info.xml
Where it's generated?

XML
<? xml version = "1.0" encoding = "utf-8" ?>
< appwidget-provider
android:initialKeyguardLayout = "@layout/new_app_widget"
android:initialLayout = "@layout/new_app_widget"
android:minWidth = "40dp"
android:minHeight = "40dp"
android:previewImage = "@drawable/example_appwidget_preview"
android:resizeMode = "horizontal|vertical"
android:updatePeriodMillis = "86400000"
android:widgetCategory = "home_screen" >
</ appwidget-provider >
5. Changes made to AndroidManifest.xml file
XML
<? xml version = "1.0" encoding = "utf-8" ?>
package = "org.geeksforgeeks.widget_basic" >
< application
android:allowBackup = "true"
android:icon = "@mipmap/ic_launcher"
android:label = "@string/app_name"
android:roundIcon = "@mipmap/ic_launcher_round"
android:supportsRtl = "true"
android:theme = "@style/AppTheme" >
< receiver android:name = ".NewAppWidget" >
< intent-filter >
< action android:name = "android.appwidget.action.APPWIDGET_UPDATE" />
</ intent-filter >
< meta-data
android:name = "android.appwidget.provider"
android:resource = "@xml/new_app_widget_info" />
</ receiver >
< activity android:name = ".MainActivity" >
< intent-filter >
< action android:name = "android.intent.action.MAIN" />
< category android:name = "android.intent.category.LAUNCHER" />
</ intent-filter >
</ activity >
</ application >
</ manifest >
Is Programming Still Required? If so, which part of the code is to be changed? (In Continuation)
Yes, Programming is still a requirement for creating widgets. Changes are made inside the NewAppWidget.kt which is a Kotlin class and its counterpart new_app_widget.xml file that displays the widget. Functionalities can be declared inside the update app widget function for the application operations and new_app_widget.xml for adding multiple elements to the widget's display. Since both the files are linked internally, altering one of them brings changes to another.
Regarding implementing multiple Widgets
There are no restrictions on the number of widgets that an app can have, however, it is advised to have a minimum number of widgets as possible as widgets are dynamically changing elements. There are update callbacks (refer to new_app_widget_info.xml file ), updatePeriodMillis is a parameter referring to which the application keeps updating the widget, meaning, the application thread to update the widget keeps running in the background, acquiring some part of the limited RAM.
How To Create Widget For Android Application
Source: https://www.geeksforgeeks.org/how-to-create-a-basic-widget-of-an-android-app/
Posted by: ruffinhiscambeste.blogspot.com
0 Response to "How To Create Widget For Android Application"
Post a Comment